
Best Lights for Wedding Photography
Portrait Photography encompasses a range of photography styles including glamour, model portfolio shoots, wedding photography, fashion, family portraits, street, and corporate Headshot photography. The equipment requirements differ for each, however one element remains critical: The quality of the light is the biggest determining factor on the quality of the result. The camera can only capture what it sees, so the lighting equipment will have more influence on the outcome than the camera body or lens. Two important factors in making a portrait image is to understand and use light to make an interesting image and to get up close to your subject, have them the centre of your viewer focus. The location or background can have really add to the viewers understanding of the subject, the streets where they are from, inside their house, a dark background to set a mood, a bright vibrant colourful backdrop. Talking with your subject is important when shooting their portrait, to get the right look and image you want for the viewer to appreciate is not as simple as
The main objective is to have nice natural looking light with interesting subjects that will please the viewer. Keeping the lighting simple can be a great way for beginners to appreciate the light they have and controlling the light by adding in one or two extra LED light sources to the image. The below example is made up of 2 small RGB LED light tubes. As you can see I have used different colour output from each tube to achieve interesting lighting of the subject. The lighting is very low key and gives a rather dramatic interesting image. Often a big and expensive setup is not required to get interesting light and images.
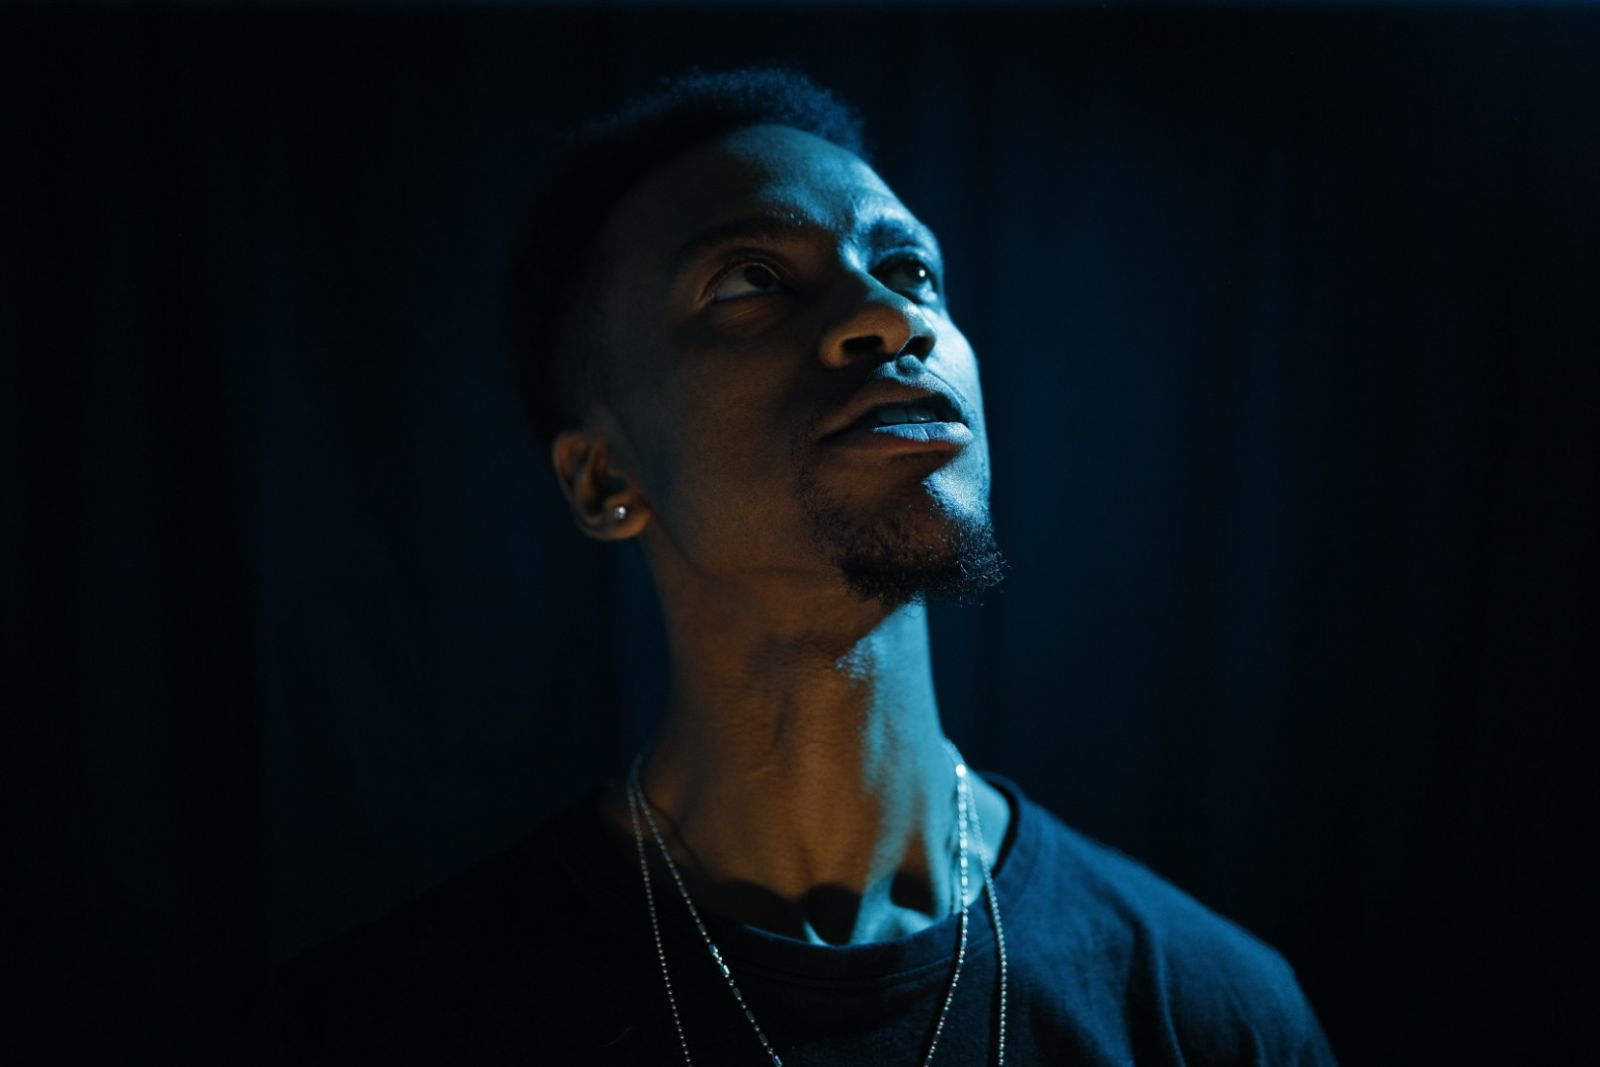
Camera, lens and settings:
Canon EOS R, Canon RF 35mm f/1.8 MACRO IS STM lens
f/1.8, 1/800 sec, ISO 1600, Manual.
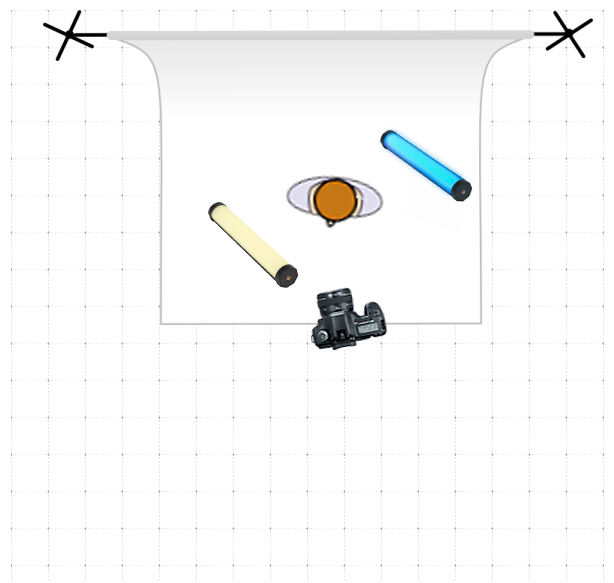
Note the right light is above the subject, while the left light is centred and at a much lower output.
Lighting used in this image:
Nanlite HDT121BHP Pavotube holder
Glamour Photography focuses on providing the customer with a memorable photo to hang on the wall. Hair and makeup are key contributors to this style of photo, as well as large softboxes to provide soft flattering light on the subject. Glamour shoots are often taken in a studio, where you have the room to use large light shapers and control any external light. Popular photographic tools for Glamour shoots are large 150cm octoboxes attached to powerful studio flashes, we would recommend the Jinbei MSN 600 PRO. The Large light source provides even light coverage on the model, to minimise shadows, and provide attractive round catchlights in the eyes. Given the permanent nature of most glamour photography studios, heavy duty light stands, or C-Stands are typically used to provide stable light sources, less likely to be accidentally knocked over by your clients or assistant. Another solution to mounting lights is a roof-mounted Pantograph system, which keeps the lights and cables off the floor, eliminating tripping hazards.
Model Portfolio Shoots
Wedding Photography
Model shoots often employ beauty dishes with a honeycomb grid to accentuate cheekbones, or full body length strip softboxes with egg-crate grids, to accentuate the models' shape.
Family Portraits were traditionally taken in a studio, but with the development in high powered lithium batteries to power portable studio flash systems, it is not popular to take family portraits on-location in a park or backyard.
Corporate Headshots are often commissioned by businesses for key staff members. The portraits are often used for website profile images, for inclusion in press releases, and to provide professional-looking LinkedIn profiles.
Let’s start with defining some of the main terminologies you’ll hear around the lighting components:
The “Key Light” or “Main Light” In any lighting set up there will be one light that functions as the main source like the sun. For a classic glamour lighting look, it should be positioned high and rotated at roughly 45 degrees to the subject from the right of the camera. It can be moved lower and further to the right of the subject to produce more extreme directional lighting effects that are generally flattering and slimming to the face. However, this Key Light should not be positioned lower than the subject’s head unless you are wanting to produce an “unnatural” effect with the shadows that will result.
The “Fill Light” This is weaker than the Key Light, so it is essentially a secondary or supplementary light. In most cases, this is placed on the opposite side to the Key light (e.g. to the left of camera, or aimed at the subject from the shadow side) to soften out the shadows and shadow lines. In general, this is flattering to the face and will produce better highlighting of the subject’s contours. In terms of settings, the Fill Light is normally set to deliver between ½ and 1/3 of the level of illumination from the Key Light. For a classic glamour look, another option is for the Fill Light to be placed directly below the Key Light, and both lights directed at the subject, (eg from the right of camera) and a reflector positioned opposite (so left of the subject) to fill in the shadows.
The “Hair Light” or “Kicker” This goes where the name suggests, above the subject to throw highlights on the hair only - but not to add light on the subject’s face. It is generally pointed in the opposite direction from the Key Light.
The “Background Light” This is one of the last lights added to a kit and used less frequently in the studio. If you use one, it is best placed low and behind the subject. It should throw a semi-circular light effect on the background - lighter in the centre and getting gradually darker toward the edges of the shot. If you have a seamless single colour background, this technique is especially effective.
Soft Light or Diffuse Light These light sources are much easier to control. An experienced professional might use parabolic reflectors on their light sources to create striking effects, but for a beginner pr intermediate level photographer, a diffused light source from a softbox, diffusion disc, or made by bouncing the light into an umbrella, are much easier to control. Another advantage is that the placement is more forgiving and less critical to the success of the shot. Many professionals that shoot studio portraits today rely on these diffuse light sources, and some would argue that it has become the dominant style. If you decide to go the more traditionalist route and use a harder light source, mastering softer lighting first will definitely help refine your skills.
3 Basic Portrait Lighting Setups
Butterfly Lighting, or Glamour Lighting: Place your Key Light high and aim it directly from the front at the subject’s face. Place your Fill Light right below the Key Light, as suggested earlier, and use a reflector opposite both lights and close to the subject to fill some light into the shadows. If you do it right you’ll see a small butterfly-shaped shadow just below the subject’s nose. Optional: Add a hair light directly above the subject which is aimed at the hair, and also a background light aimed at the background from a low angle.
Rembrandt Lighting: This gets its name from the lighting style found in many Rembrandt paintings. Place the Key Light at just under 90* angle and slightly to the front of the left side of the subject’s face, and then place the Fill Light on the opposite side of the camera from the Key Light, close to the line between the camera and the subject. Kickers are also used in this technique to bring out the sides of the face and define the shoulders. If you do this right you will see a small triangle of light on the subject’s cheek.
Split Lighting: This technique draws its name from the effect - the Key Light illuminates just half the face, and it gives a dramatic effect when no Fill Light at all is added. The Key Light is aimed at one side of the subject’s face (typically the left) again, at nearly right angles but positioned slightly behind the subject. If desired, a weak fill light can be positioned on the other side, close to the camera. This should minimize any facial defects, and if you choose to use hair light and background lights, remember the placement advice given above.

Simple instalment plans available instantly at checkout


Use your existing debit or credit card

No long forms, instant approval online

Pay fortnightly, enjoy your purchase straight away!
All your need is:
1) An Australian Visa or Mastercard debit/credit card; 2) To be over 18 years of age; 3) To live in Australia
To see Afterpay's complete terms, visit https://www.afterpay.com.au/terms
© 2026 Afterpay